This guide walks through how to configure a KUDO with Audio Manager for Dante audio output.
Audience: Audio Managers, AV technicians, Operators, and meeting organizers configuring KUDO AI audio output for onsite, hybrid, or broadcast workflows.
Before You Start
Before configuring Audio Manager and Dante output, confirm that the KUDO meeting is ready to be scheduled, Dante Virtual Soundcard is installed on the Audio Manager computer, Dante Controller is installed and configured on the Dante network, and the Audio Manager computer is connected to the same Dante network as the destination devices.
For the best audio stability, use a wired Ethernet connection, avoid Wi-Fi for Dante workflows, close unnecessary audio applications, and confirm that Dante network and clock synchronization are stable before the meeting begins.
Important: Venue Audio OUT is available for both AI and Human interpretation sessions. Venue Audio IN is only supported for Human interpretation workflows.
Scheduling a Meeting with Audio Manager
- While scheduling the KUDO meeting, click Advanced Settings and scroll down to enable the Audio Manager role. This allows translated language channels to be routed externally through Dante-compatible workflows.
- Click the Users tab, select Audio Managers, then click + Add Audio Manager and enter the user's details. If this is their first Audio Manager session, they'll need to complete the account setup from the invitation email before joining the meeting.
Configuring Audio Manager
- On a dedicated Audio Manager computer, install and open Dante Virtual Soundcard. Set the Audio Interface to WDM and Channels to 16 x 16, then click Start to enable it.
- Log in to KUDO using the assigned Audio Manager credentials.
- Select the Audio Manager role to access Dante routing and venue audio configuration tools.
- Locate the meeting, go to Settings, and select Venue Audio OUT.
- Venue Audio IN sends onsite interpreter booth audio into KUDO. Available for Human interpretation sessions only.
- Venue Audio OUT sends translated KUDO audio to external devices, Dante systems, or broadcast infrastructure. Available for both AI and Human interpretation sessions.
- Click Edit Audio Settings.
- Find the Dante Virtual Soundcard device and assign each translated language channel to the desired Dante output channel. Click Save when finished.
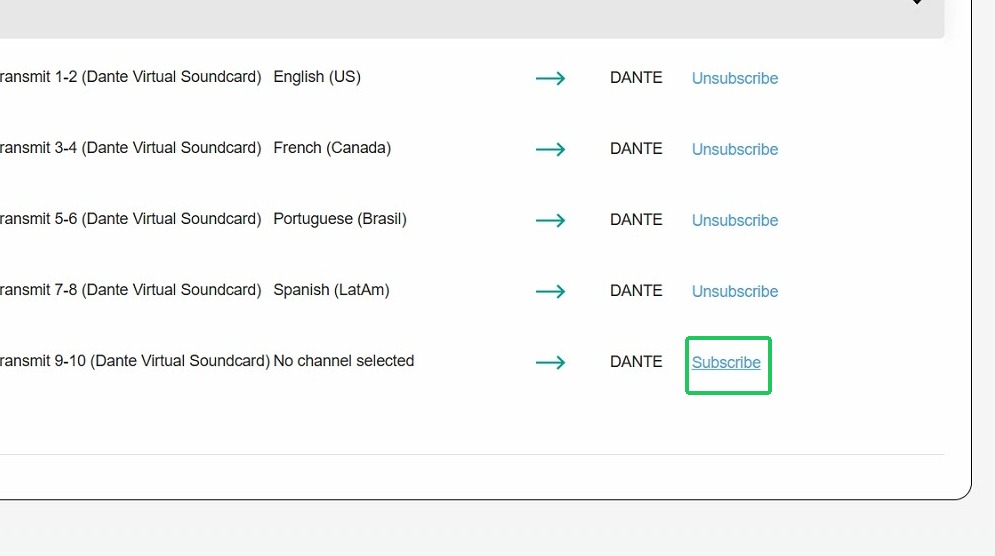
- Inside Dante Controller, subscribe each translated language output to the appropriate Dante destination channel. Once subscribed, translated language channels are available for routing and monitoring across the Dante network.
Troubleshooting
| Issue / Task | Possible Cause | Recommended Action |
|---|---|---|
| Translated Dante channels are not visible inside Dante Controller | Dante devices are not synchronized to the same Dante clock source | Verify that all Dante devices are properly synchronized to the same Dante clock source before the meeting begins. |
| Dante devices are not visible or translated audio is unavailable | Dante network connectivity issue | Confirm that Dante Virtual Soundcard is running, the Audio Manager computer is connected to the Dante network, the destination Dante devices are visible inside Dante Controller, the firewall or network policies are not blocking Dante traffic. |
| Translated audio channels stop updating or routing becomes unstable | Dante routing or Audio Manager connection instability | Restart Dante Virtual Soundcard, reopen Audio Manager, and verify Dante subscriptions inside Dante Controller. Translated audio feeds may temporarily disconnect while the routing reconnects. |